Redux Fundamentals, Part 4: Store
- How to create a Redux store
- How to use the store to update state and listen for updates
- How to configure the store to extend its capabilities
- How to set up the Redux DevTools Extension to debug your app
Introduction
In Part 3: State, Actions, and Reducers, we started writing our example todo app. We
listed business requirements, defined the state structure we need to make the app work, and created a series of action types
to describe "what happened" and match the kinds of events that can happen as a user interacts with our app. We also wrote reducer functions that can handle updating our state.todos and state.filters sections, and saw how we can use the Redux combineReducers function
to create a "root reducer" based on the different "slice reducers" for each feature in our app.
Now, it's time to pull those pieces together, with the central piece of a Redux app: the store.
Note that this tutorial intentionally shows older-style Redux logic patterns that require more code than the "modern Redux" patterns with Redux Toolkit we teach as the right approach for building apps with Redux today, in order to explain the principles and concepts behind Redux. It's not meant to be a production-ready project.
See these pages to learn how to use "modern Redux" with Redux Toolkit:
- The full "Redux Essentials" tutorial, which teaches "how to use Redux, the right way" with Redux Toolkit for real-world apps. We recommend that all Redux learners should read the "Essentials" tutorial!
- Redux Fundamentals, Part 8: Modern Redux with Redux Toolkit, which shows how to convert the low-level examples from earlier sections into modern Redux Toolkit equivalents
Redux Store
The Redux store brings together the state, actions, and reducers that make up your app. The store has several responsibilities:
- Holds the current application state inside
- Allows access to the current state via
store.getState(); - Allows state to be updated via
store.dispatch(action); - Registers listener callbacks via
store.subscribe(listener); - Handles unregistering of listeners via the
unsubscribefunction returned bystore.subscribe(listener).
It's important to note that you'll only have a single store in a Redux application. When you want to split your data handling logic, you'll use reducer composition and create multiple reducers that can be combined together, instead of creating separate stores.
Creating a Store
Every Redux store has a single root reducer function. In the previous section, we created a root reducer function using combineReducers. That root reducer is currently defined in src/reducer.js in our example app. Let's import that root reducer and create our first store.
The Redux core library has a createStore API that will create the store. Add a new file
called store.js, and import createStore and the root reducer. Then, call createStore and pass in the root reducer:
import { createStore } from 'redux'
import rootReducer from './reducer'

const store = createStore(rootReducer)

export default store
Loading Initial State
createStore can also accept a preloadedState value as its second argument. You could use this to add
initial data when the store is created, such as values that were included in an HTML page sent from the server, or persisted in
localStorage and read back when the user visits the page again, like this:
import { createStore } from 'redux'
import rootReducer from './reducer'

let preloadedState
const persistedTodosString = localStorage.getItem('todos')

if (persistedTodosString) {
  preloadedState = {
    todos: JSON.parse(persistedTodosString)
  }
}

const store = createStore(rootReducer, preloadedState)
Dispatching Actions
Now that we have created a store, let's verify our program works! Even without any UI, we can already test the update logic.
Before you run this code, try going back to src/features/todos/todosSlice.js, and remove all the example todo objects from the initialState so that it's an empty array. That will make the output from this example a bit easier to read.
// Omit existing React imports

import store from './store'

// Log the initial state
console.log('Initial state: ', store.getState())
// {todos: [....], filters: {status, colors}}

// Every time the state changes, log it
// Note that subscribe() returns a function for unregistering the listener
const unsubscribe = store.subscribe(() =>
  console.log('State after dispatch: ', store.getState())
)

// Now, dispatch some actions

store.dispatch({ type: 'todos/todoAdded', payload: 'Learn about actions' })
store.dispatch({ type: 'todos/todoAdded', payload: 'Learn about reducers' })
store.dispatch({ type: 'todos/todoAdded', payload: 'Learn about stores' })

store.dispatch({ type: 'todos/todoToggled', payload: 0 })
store.dispatch({ type: 'todos/todoToggled', payload: 1 })

store.dispatch({ type: 'filters/statusFilterChanged', payload: 'Active' })

store.dispatch({
  type: 'filters/colorFilterChanged',
  payload: { color: 'red', changeType: 'added' }
})

// Stop listening to state updates
unsubscribe()

// Dispatch one more action to see what happens

store.dispatch({ type: 'todos/todoAdded', payload: 'Try creating a store' })

// Omit existing React rendering logic
Remember, every time we call store.dispatch(action):
- The store calls
rootReducer(state, action)- That root reducer may call other slice reducers inside of itself, like
todosReducer(state.todos, action)
- That root reducer may call other slice reducers inside of itself, like
- The store saves the new state value inside
- The store calls all the listener subscription callbacks
- If a listener has access to the
store, it can now callstore.getState()to read the latest state value
If we look at the console log output from that example, you can see how the Redux state changes as each action was dispatched:
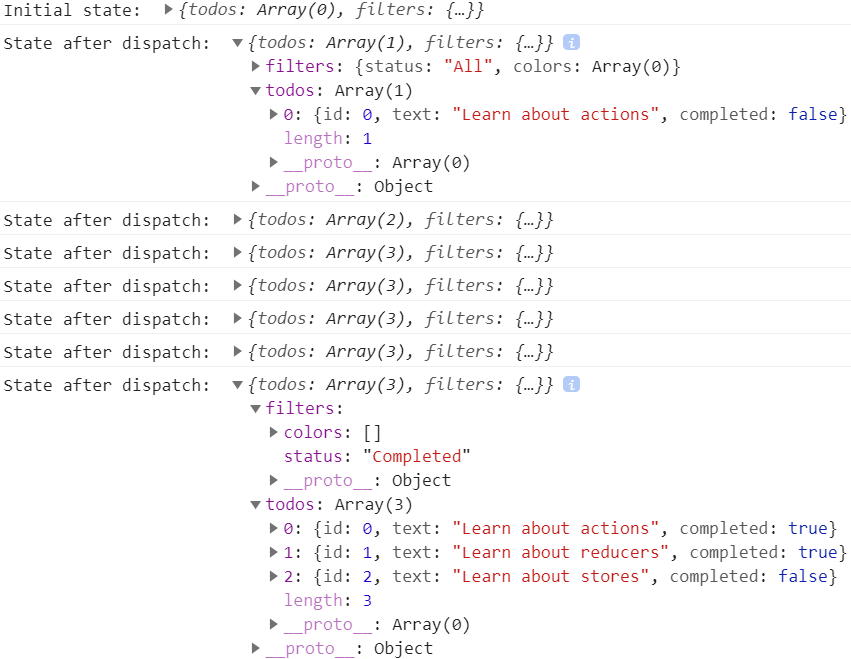
Notice that our app did not log anything from the last action. That's because we removed the listener callback when we called unsubscribe(), so nothing else ran after the action was dispatched.
We specified the behavior of our app before we even started writing the UI. That helps give us confidence that the app will work as intended.
If you want, you can now try writing tests for your reducers. Because they're pure functions, it should be straightforward to test them. Call them with an example state and action,
take the result, and check to see if it matches what you expect:
import todosReducer from './todosSlice'

test('Toggles a todo based on id', () => {
  const initialState = [{ id: 0, text: 'Test text', completed: false }]

  const action = { type: 'todos/todoToggled', payload: 0 }
  const result = todosReducer(initialState, action)
  expect(result[0].completed).toBe(true)
})
Inside a Redux Store
It might be helpful to take a peek inside a Redux store to see how it works. Here's a miniature example of a working Redux store, in about 25 lines of code:
function createStore(reducer, preloadedState) {
  let state = preloadedState
  const listeners = []

  function getState() {
    return state
  }

  function subscribe(listener) {
    listeners.push(listener)
    return function unsubscribe() {
      const index = listeners.indexOf(listener)
      listeners.splice(index, 1)
    }
  }

  function dispatch(action) {
    state = reducer(state, action)
    listeners.forEach(listener => listener())
  }

  dispatch({ type: '@@redux/INIT' })

  return { dispatch, subscribe, getState }
}
This small version of a Redux store works well enough that you could use it to replace the actual Redux createStore function you've been using in your app so far. (Try it and see for yourself!) The actual Redux store implementation is longer and a bit more complicated, but most of that is comments, warning messages, and handling some edge cases.
As you can see, the actual logic here is fairly short:
- The store has the current
statevalue andreducerfunction inside of itself getStatereturns the current state valuesubscribekeeps an array of listener callbacks and returns a function to remove the new callbackdispatchcalls the reducer, saves the state, and runs the listeners- The store dispatches one action on startup to initialize the reducers with their state
- The store API is an object with
{dispatch, subscribe, getState}inside
To emphasize one of those in particular: notice that getState just returns whatever the current state value is. That means that by default, nothing prevents you from accidentally mutating the current state value! This code will run without any errors, but it's incorrect:
const state = store.getState()
// ❌ Don't do this - it mutates the current state!
state.filters.status = 'Active'
In other words:
- The Redux store doesn't make an extra copy of the
statevalue when you callgetState(). It's exactly the same reference that was returned from the root reducer function - The Redux store doesn't do anything else to prevent accidental mutations. It is possible to mutate the state, either inside a reducer or outside the store, and you must always be careful to avoid mutations.
One common cause of accidental mutations is sorting arrays. Calling array.sort() actually mutates the existing array. If we called const sortedTodos = state.todos.sort(), we'd end up mutating the real store state unintentionally.
In Part 8: Modern Redux, we'll see how Redux Toolkit helps avoid mutations in reducers, and detects and warns about accidental mutations outside of reducers.
Configuring the Store
We've already seen that we can pass rootReducer and preloadedState arguments to createStore. However, createStore can also take one more argument, which is used to customize the store's abilities and give it new powers.
Redux stores are customized using something called a store enhancer. A store enhancer is like a special version of createStore that adds another layer wrapping around the original Redux store. An enhanced store can then change how the store behaves, by supplying its own versions of the store's dispatch, getState, and subscribe functions instead of the originals.
For this tutorial, we won't go into details about how store enhancers actually work - we'll focus on how to use them.
Creating a Store with Enhancers
Our project has two small example store enhancers available, in the src/exampleAddons/enhancers.js file:
sayHiOnDispatch: an enhancer that always logs'Hi'!to the console every time an action is dispatchedincludeMeaningOfLife: an enhancer that always adds the fieldmeaningOfLife: 42to the value returned fromgetState()
Let's start by using sayHiOnDispatch. First, we'll import it, and pass it to createStore:
import { createStore } from 'redux'
import rootReducer from './reducer'
import { sayHiOnDispatch } from './exampleAddons/enhancers'

const store = createStore(rootReducer, undefined, sayHiOnDispatch)

export default store
We don't have a preloadedState value here, so we'll pass undefined as the second argument instead.
Next, let's try dispatching an action:
import store from './store'

console.log('Dispatching action')
store.dispatch({ type: 'todos/todoAdded', payload: 'Learn about actions' })
console.log('Dispatch complete')
Now look at the console. You should see 'Hi!' logged there, in between the other two log statements:

The sayHiOnDispatch enhancer wrapped the original store.dispatch function with its own specialized version of dispatch. When we called store.dispatch(), we were actually calling the wrapper function from sayHiOnDispatch, which called the original and then printed 'Hi'.
Now, let's try adding a second enhancer. We can import includeMeaningOfLife from that same file... but we have a problem. createStore only accepts one enhancer as its third argument! How can we pass two enhancers at the same time?
What we really need is some way to merge both the sayHiOnDispatch enhancer and the includeMeaningOfLife enhancer into a single combined enhancer, and then pass that instead.
Fortunately, the Redux core includes a compose function that can be used to merge multiple enhancers together. Let's use that here:
import { createStore, compose } from 'redux'
import rootReducer from './reducer'
import {
  sayHiOnDispatch,
  includeMeaningOfLife
} from './exampleAddons/enhancers'

const composedEnhancer = compose(sayHiOnDispatch, includeMeaningOfLife)

const store = createStore(rootReducer, undefined, composedEnhancer)

export default store
Now we can see what happens if we use the store:
import store from './store'

store.dispatch({ type: 'todos/todoAdded', payload: 'Learn about actions' })
// log: 'Hi!'

console.log('State after dispatch: ', store.getState())
// log: {todos: [...], filters: {status, colors}, meaningOfLife: 42}
And the logged output looks like this:
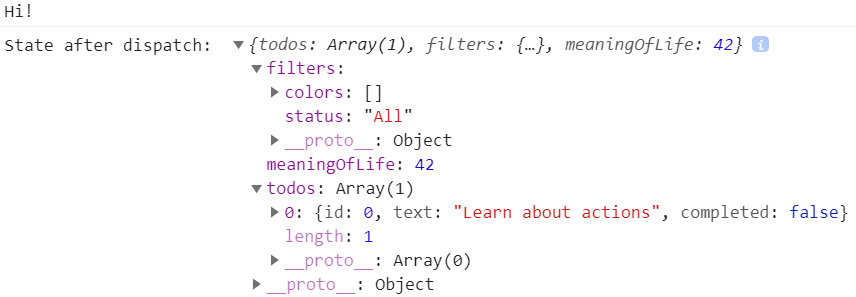
So, we can see that both enhancers are modifying the behavior of the store at the same time. sayHiOnDispatch has changed how dispatch works, and includeMeaningOfLife has changed how getState works.
Store enhancers are a very powerful way to modify the store, and almost all Redux apps will include at least one enhancer when setting up the store.
If you don't have any preloadedState to pass in, you can pass the enhancer as the second argument instead:
const store = createStore(rootReducer, storeEnhancer)
Middleware
Enhancers are powerful because they can override or replace any of the store's methods: dispatch, getState, and subscribe.
But, much of the time, we only need to customize how dispatch behaves. It would be nice if there was a way to add some customized behavior when dispatch runs.
Redux uses a special kind of addon called middleware to let us customize the dispatch function.
If you've ever used a library like Express or Koa, you might already be familiar with the idea of adding middleware to customize behavior. In these frameworks, middleware is some code you can put between the framework receiving a request, and the framework generating a response. For example, Express or Koa middleware may add CORS headers, logging, compression, and more. The best feature of middleware is that it's composable in a chain. You can use multiple independent third-party middleware in a single project.
Redux middleware solves different problems than Express or Koa middleware, but in a conceptually similar way. Redux middleware provides a third-party extension point between dispatching an action, and the moment it reaches the reducer. People use Redux middleware for logging, crash reporting, talking to an asynchronous API, routing, and more.
First, we'll look at how to add middleware to the store, then we'll show how you can write your own.
Using Middleware
We already saw that you can customize a Redux store using store enhancers. Redux middleware are actually implemented on top of a very special store enhancer that comes built in with Redux, called applyMiddleware.
Since we already know how to add enhancers to our store, we should be able to do that now. We'll start with applyMiddleware by itself, and we'll add three example middleware that have been included in this project.
import { createStore, applyMiddleware } from 'redux'
import rootReducer from './reducer'
import { print1, print2, print3 } from './exampleAddons/middleware'

const middlewareEnhancer = applyMiddleware(print1, print2, print3)

// Pass enhancer as the second arg, since there's no preloadedState
const store = createStore(rootReducer, middlewareEnhancer)

export default store
As their names say, each of these middleware will print a number when an action is dispatched.
What happens if we dispatch now?
import store from './store'

store.dispatch({ type: 'todos/todoAdded', payload: 'Learn about actions' })
// log: '1'
// log: '2'
// log: '3'
And we can see the output in the console:

So how does that work?
Middleware form a pipeline around the store's dispatch method. When we call store.dispatch(action), we're actually calling the first middleware in the pipeline. That middleware can then do anything it wants when it sees the action. Typically, a middleware will check to see if the action is a specific type that it cares about, much like a reducer would. If it's the right type, the middleware might run some custom logic. Otherwise, it passes the action to the next middleware in the pipeline.
Unlike a reducer, middleware can have side effects inside, including timeouts and other async logic.
In this case, the action is passed through:
- The
print1middleware (which we see asstore.dispatch) - The
print2middleware - The
print3middleware - The original
store.dispatch - The root reducer inside
store
And since these are all function calls, they all return from that call stack. So, the print1 middleware is the first to run, and the last to finish.
Writing Custom Middleware
We can also write our own middleware. You might not need to do this all the time, but custom middleware are a great way to add specific behaviors to a Redux application.
Redux middleware are written as a series of three nested functions. Let's see what that pattern looks like. We'll start by trying to write this middleware using the function keyword, so that it's more clear what's happening:
// Middleware written as ES5 functions

// Outer function:
function exampleMiddleware(storeAPI) {
  return function wrapDispatch(next) {
    return function handleAction(action) {
      // Do anything here: pass the action onwards with next(action),
      // or restart the pipeline with storeAPI.dispatch(action)
      // Can also use storeAPI.getState() here

      return next(action)
    }
  }
}
Let's break down what these three functions do and what their arguments are.
exampleMiddleware: The outer function is actually the "middleware" itself. It will be called byapplyMiddleware, and receives astoreAPIobject containing the store's{dispatch, getState}functions. These are the samedispatchandgetStatefunctions that are actually part of the store. If you call thisdispatchfunction, it will send the action to the start of the middleware pipeline. This is only called once.wrapDispatch: The middle function receives a function callednextas its argument. This function is actually the next middleware in the pipeline. If this middleware is the last one in the sequence, thennextis actually the originalstore.dispatchfunction instead. Callingnext(action)passes the action to the next middleware in the pipeline. This is also only called oncehandleAction: Finally, the inner function receives the currentactionas its argument, and will be called every time an action is dispatched.
You can give these middleware functions any names you want, but it can help to use these names to remember what each one does:
- Outer:
someCustomMiddleware(or whatever your middleware is called) - Middle:
wrapDispatch - Inner:
handleAction
Because these are normal functions, we can also write them using ES2015 arrow functions. This lets us write them shorter because arrow functions don't have to have a return statement, but it can also be a bit harder to read if you're not yet familiar with arrow functions and implicit returns.
Here's the same example as above, using arrow functions:
const anotherExampleMiddleware = storeAPI => next => action => {
  // Do something in here, when each action is dispatched

  return next(action)
}
We're still nesting those three functions together, and returning each function, but the implicit returns make this shorter.
Your First Custom Middleware
Let's say we want to add some logging to our application. We'd like to see the contents of each action in the console when it's dispatched, and we'd like to see what the state is after the action has been handled by the reducers.
These example middleware aren't specifically part of the actual todo app, but you can try adding them to your project to see what happens when you use them.
We can write a small middleware that will log that information to the console for us:
const loggerMiddleware = storeAPI => next => action => {
  console.log('dispatching', action)
  let result = next(action)
  console.log('next state', storeAPI.getState())
  return result
}
Whenever an action is dispatched:
- The first part of the
handleActionfunction runs, and we print'dispatching' - We pass the action to the
nextsection, which may be another middleware or the realstore.dispatch - Eventually the reducers run and the state is updated, and the
nextfunction returns - We can now call
storeAPI.getState()and see what the new state is - We finish by returning whatever
resultvalue came from thenextmiddleware
Any middleware can return any value, and the return value from the first middleware in the pipeline is actually returned when you call store.dispatch(). For example:
const alwaysReturnHelloMiddleware = storeAPI => next => action => {
  const originalResult = next(action)
  // Ignore the original result, return something else
  return 'Hello!'
}

const middlewareEnhancer = applyMiddleware(alwaysReturnHelloMiddleware)
const store = createStore(rootReducer, middlewareEnhancer)

const dispatchResult = store.dispatch({ type: 'some/action' })
console.log(dispatchResult)
// log: 'Hello!'
Let's try one more example. Middleware often look for a specific action, and then do something when that action is dispatched. Middleware also have the ability to run async logic inside. We can write a middleware that prints something on a delay when it sees a certain action:
const delayedMessageMiddleware = storeAPI => next => action => {
  if (action.type === 'todos/todoAdded') {
    setTimeout(() => {
      console.log('Added a new todo: ', action.payload)
    }, 1000)
  }

  return next(action)
}
This middleware will look for "todo added" actions. Every time it sees one, it sets a 1-second timer, and then prints the action's payload to the console.
Middleware Use Cases
So, what can we do with middleware? Lots of things!
A middleware can do anything it wants when it sees a dispatched action:
- Log something to the console
- Set timeouts
- Make asynchronous API calls
- Modify the action
- Pause the action or even stop it entirely
and anything else you can think of.
In particular, middleware are intended to contain logic with side effects. In addition, middleware can modify dispatch to accept things that are not plain action objects. We'll talk more about both of these in Part 6: Async Logic.
Redux DevTools
Finally, there's one more very important thing to cover with configuring the store.
Redux was specifically designed to make it easier to understand when, where, why, and how your state has changed over time. As part of that, Redux was built to enable the use of the Redux DevTools - an addon that shows you a history of what actions were dispatched, what those actions contained, and how the state changed after each dispatched action.
The Redux DevTools UI is available as a browser extension for Chrome and Firefox. If you haven't already added that to your browser, go ahead and do that now.
Once that's installed, open up the browser's DevTools window. You should now see a new "Redux" tab there. It doesn't do anything, yet - we've got to set it up to talk to a Redux store first.
Adding the DevTools to the Store
Once the extension is installed, we need to configure the store so that the DevTools can see what's happening inside. The DevTools require a specific store enhancer to be added to make that possible.
The Redux DevTools Extension docs have some instructions on how to set up the store, but the steps listed are a bit complicated. However, there's an NPM package called redux-devtools-extension that takes care of the complicated part. That package exports a specialized composeWithDevTools function that we can use instead of the original Redux compose function.
Here's how that looks:
import { createStore, applyMiddleware } from 'redux'
import { composeWithDevTools } from 'redux-devtools-extension'
import rootReducer from './reducer'
import { print1, print2, print3 } from './exampleAddons/middleware'

const composedEnhancer = composeWithDevTools(
  // EXAMPLE: Add whatever middleware you actually want to use here
  applyMiddleware(print1, print2, print3)
  // other store enhancers if any
)

const store = createStore(rootReducer, composedEnhancer)
export default store
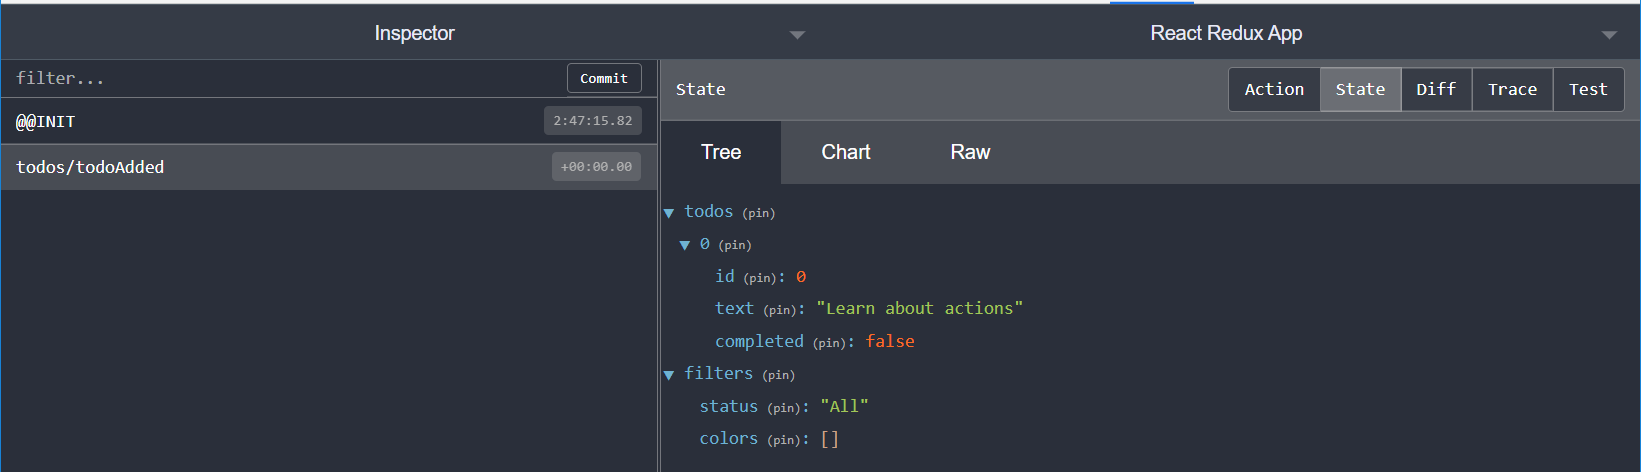
Make sure that index.js is still dispatching an action after importing the store. Now, open up the Redux DevTools tab in the browser's DevTools window. You should see something that looks like this:
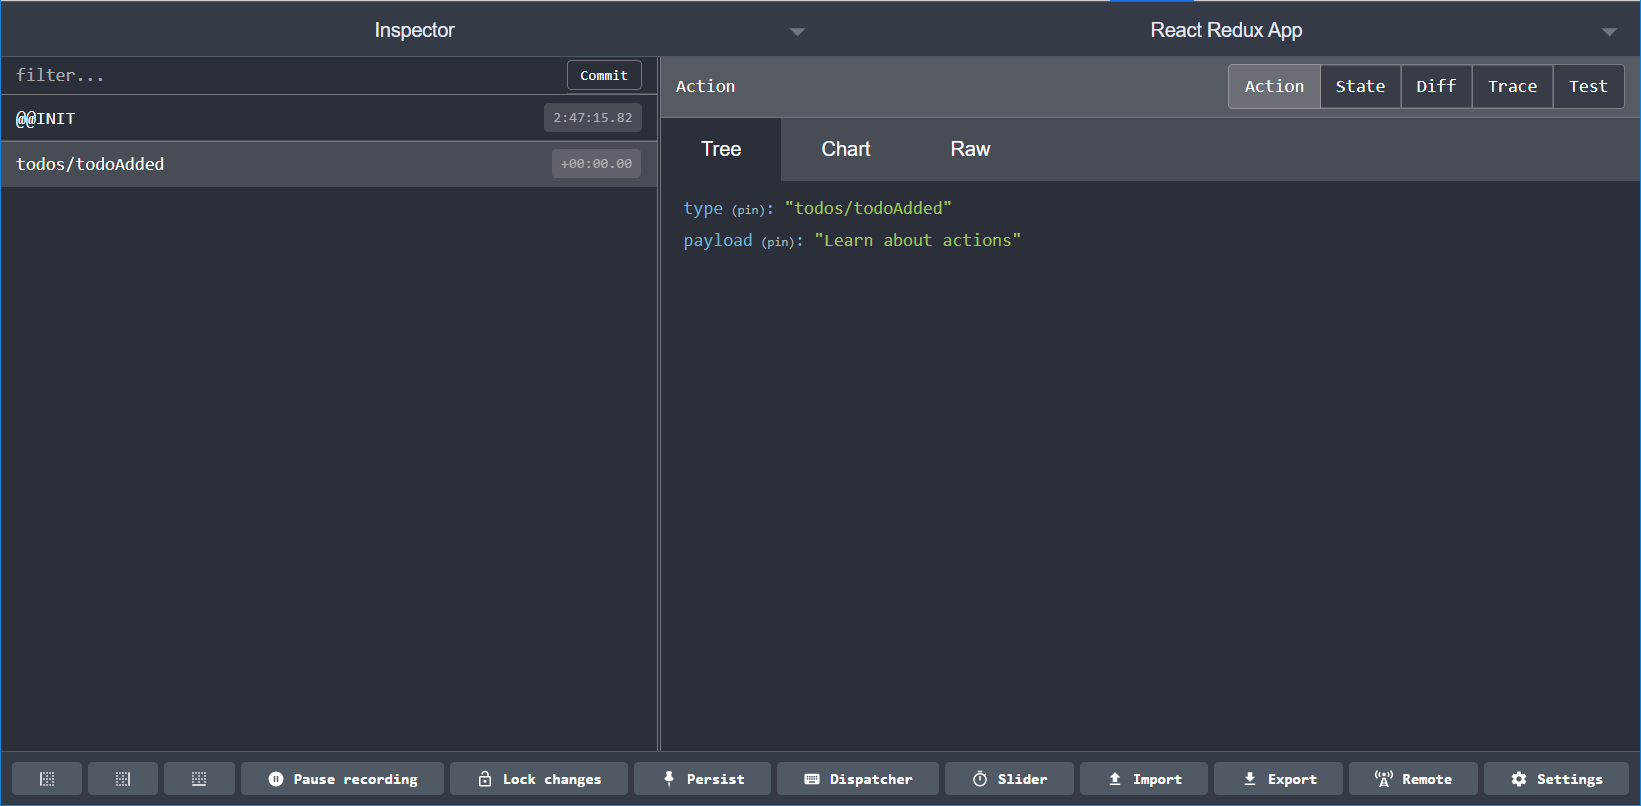
There's a list of dispatched actions on the left. If we click one of them, the right panel shows several tabs:
- The contents of that action object
- The entire Redux state as it looked after the reducer ran
- The diff between the previous state and this state
- If enabled, the function stack trace leading back to the line of code that called
store.dispatch()in the first place
Here's what the "State" and "Diff" tabs look like after we dispatched that "add todo" action:

These are very powerful tools that can help us debug our apps and understand exactly what's happening inside.
What You've Learned
As you've seen, the store is the central piece of every Redux application. Stores contain state and handle actions by running reducers, and can be customized to add additional behaviors.
Let's see how our example app looks now:
And as a reminder, here's what we covered in this section:
- Redux apps always have a single store
- Stores are created with the Redux
createStoreAPI - Every store has a single root reducer function
- Stores are created with the Redux
- Stores have three main methods
getStatereturns the current statedispatchsends an action to the reducer to update the statesubscribetakes a listener callback that runs each time an action is dispatched
- Store enhancers let us customize the store when it's created
- Enhancers wrap the store and can override its methods
createStoreaccepts one enhancer as an argument- Multiple enhancers can be merged together using the
composeAPI
- Middleware are the main way to customize the store
- Middleware are added using the
applyMiddlewareenhancer - Middleware are written as three nested functions inside each other
- Middleware run each time an action is dispatched
- Middleware can have side effects inside
- Middleware are added using the
- The Redux DevTools let you see what's changed in your app over time
- The DevTools Extension can be installed in your browser
- The store needs the DevTools enhancer added, using
composeWithDevTools - The DevTools show dispatched actions and changes in state over time
What's Next?
We now have a working Redux store that can run our reducers and update the state when we dispatch actions.
However, every app needs a user interface to display the data and let the user do something useful. In Part 5: UI and React, we'll see how the Redux store works with a UI, and specifically see how Redux can work together with React.